4 tips to soften holiday shipping surcharges

With ongoing inflation and supply chain issues, keeping your shipping budget on track will be challenging this holiday season; this includes budgeting for peak holiday surcharges from carriers. How can you offset higher shipping costs during the busiest shipping season of the entire year? Also, our study with Retail Economics found that 30.3% of customers think the delivery cost is the most important factor when trying to decide whether or not to purchase from a business. So, raising your shipping costs needs to be a last resort to better align with your customers’ expectations. We’re going to summarize some of these surcharges for you as well as give you the gift of four tips to help keep your holiday shipping budget intact. 

Summary of 2022 carrier holiday surcharges

Holiday surcharges are additional and/or increased fees that are applied to certain carrier services throughout the holiday shipping season. These surcharges typically include increases in the amount you pay for a service when using it to ship or increases in adjustments you can receive year-round for things like incorrect shipment measurements or using incorrect packaging. Holiday surcharges usually begin in early to mid-fall and stay in effect through the holiday season and into the new year. We’ve highlighted some of the biggest holiday surcharges for each carrier below. 

USPS*: Midnight (12:00 AM) on October 22, 2022 – Midnight (12:00 AM) on January 22, 2023 

  • $.25 – $6.50 increase for Priority Mail®  and Priority Mail Express® services with USPS Commercial Rates  

*All USPS Holiday surcharges can be found on our blog

FedEx: September 5, 2022 – January 15, 2023

FedEx is basing holiday surcharges on shippers’ specific parcel volume. These charges will vary from $1.25 – $7, depending on the volume. We recommend visiting FedEx’s website directly for more information. 

4 tips to lower the impact of carrier holiday surcharges

Order free packaging

Carriers like USPS offer free packaging for services like Priority Mail, so you don’t have to worry about finding boxes on your own. You can even order some of these supplies directly from your Stamps.com account. Free USPS supplies usually arrive in 5-7 business days, so you can plan your supply orders accordingly throughout the holiday season. Also, when you order free USPS supplies through Stamps.com, some of these supplies can be automatically shipped after a specific timeframe, so you can just sit back and sip your hot chocolate. 

Carefully measure and weigh your shipments 

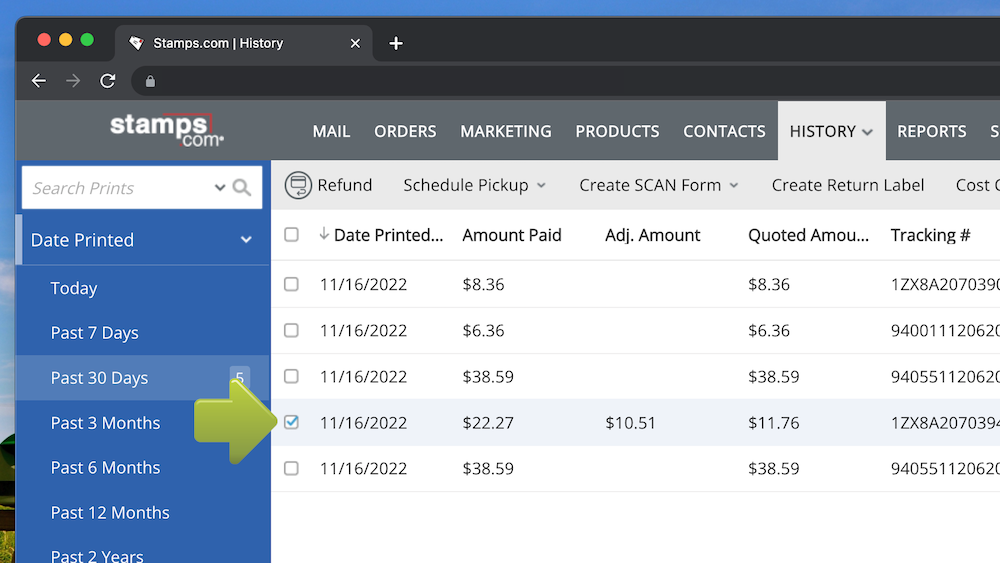
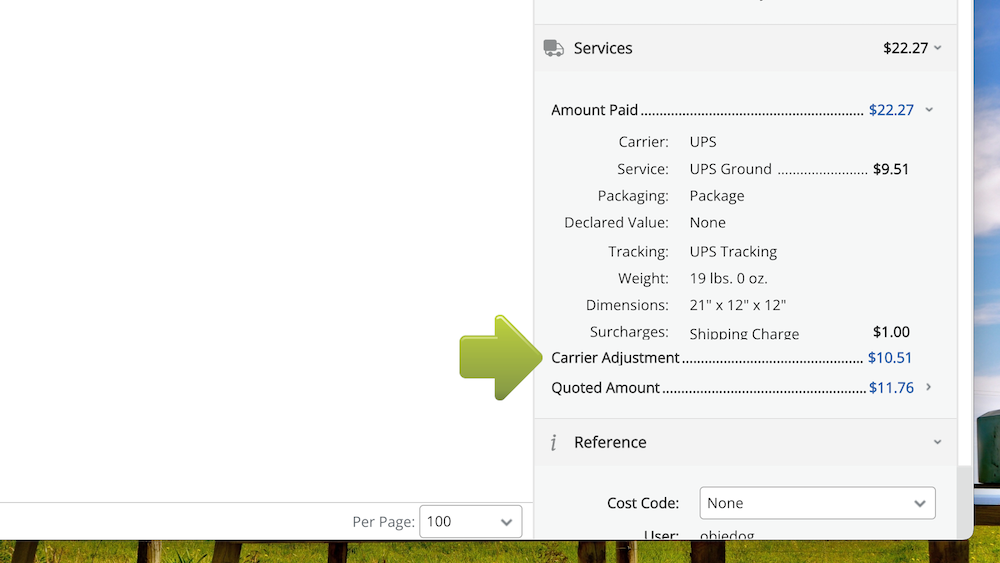
With peak holiday surcharges increasing costs, measuring your boxes correctly is more important than ever. Don’t be afraid to measure and weigh your boxes multiple times so your calculations are as accurate as possible. This way, you’ll cut down on the likelihood of receiving adjustment fees and charges, some of which increase during the holiday season.  

It’s also the perfect time to familiarize yourself with Dimensional, or DIM, weight. DIM weight is based on the measurements of your package as opposed to the number you see when you place your package on the scale. For USPS and UPS Shipping, you’ll start by finding your shipment’s volume (length x width x height). If this number is smaller than 1728, your shipping cost will be calculated based on your shipment’s actual weight. If this number is larger than 1728, you’ll divide this number by 166 to find your shipment’s DIM weight.*

*Note: If you’re shipping to Canada, you’ll divide this number by 139. 

Introduce product bundles to increase AOV

The holiday season is a great time to create product bundles because it can help increase your average order value or AOV. For example, if your store sells electronics, you could offer customers a new phone case and charging cable whenever they buy a new iPhone. These product bundles can even be promoted on your store’s website or in your customer communications to highlight deals and increase your AOV. A higher AOV means more money back to your store, so you can help offset the cost of holiday surcharges. 

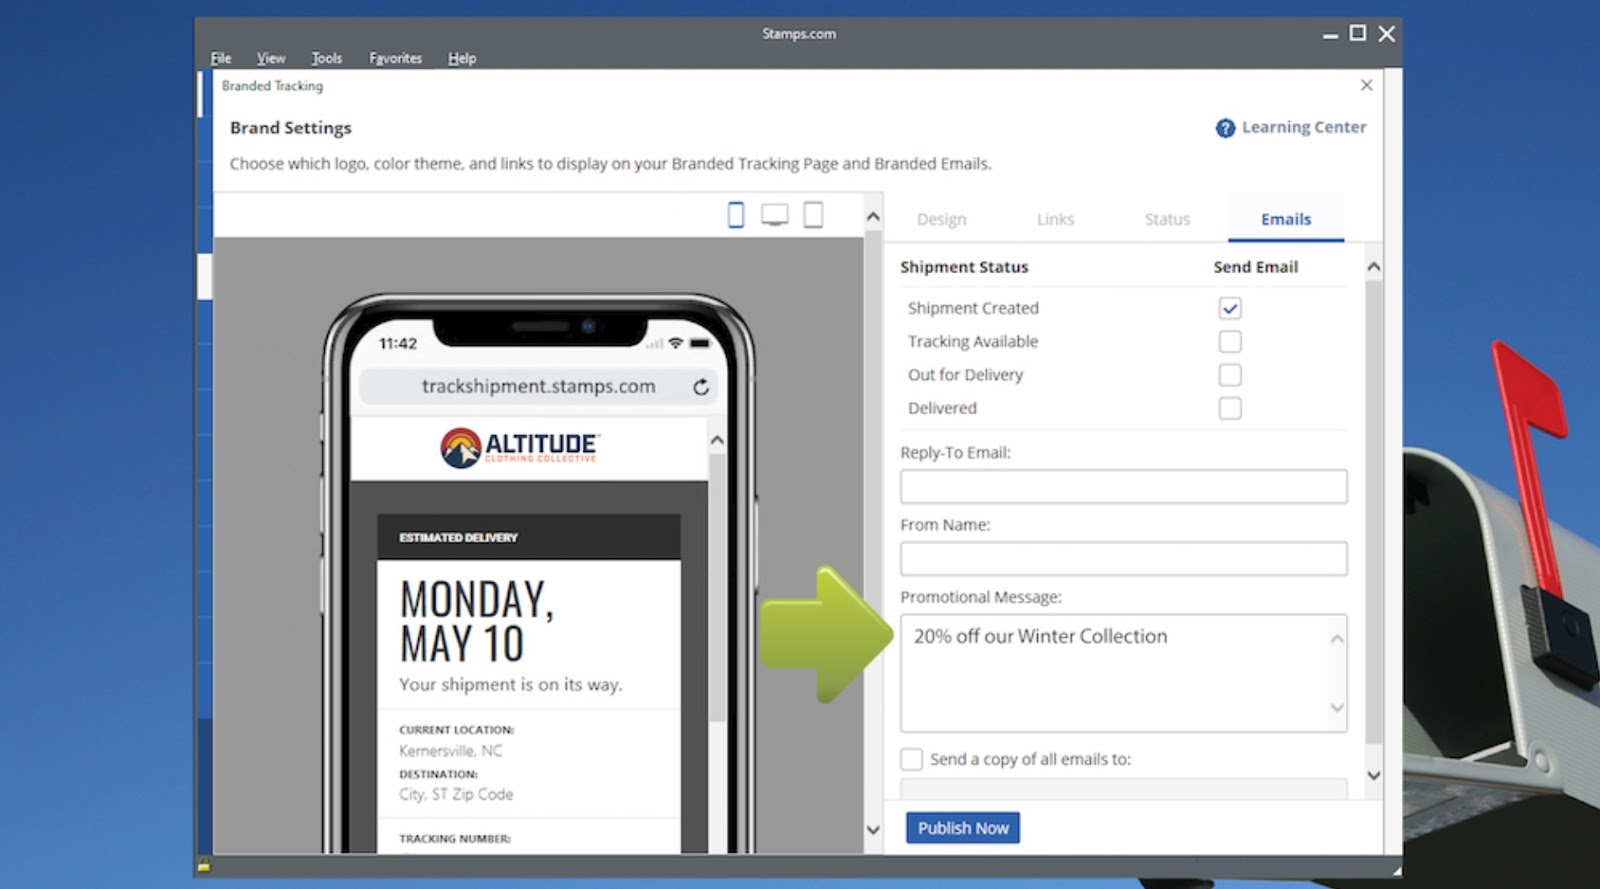
Offer promotions to increase sales 

Offering free shipping or free shipping over a certain threshold are two of the best ways to earn more sales during the holidays. If a customer is close to the free shipping threshold, they’re more likely to grab an additional item or two. You can even showcase smaller items as recommended products to help your customers remember things they might have forgotten while shopping. Sending your repeat customers exclusive holiday discounts will also help to not only boost your sales but show your customers you care. 

Conclusion

Ongoing financial and availability strains are going to be prominent throughout this holiday season, so peak holiday surcharges are significant to budget for. The increases for these services are unavoidable, so finding ways to save on your shipping costs is key. Utilizing free USPS supplies, offering your customers promotions, creating product bundles, and measuring/weighing your shipments before buying postage are all easy ways to offset those surcharge costs. Taking the time to incorporate these tips into your holiday shipping routine will help you increase your sales and cut back on your shipping costs while setting you up for year-round success. 


Keep your holiday shipping merry and bright by signing up for a free trial with Stamps.com.

Easy Guidelines to Fllow for Effective USPS Shipping

A smooth shipping process not only helps streamline your operations as an e-commerce seller, but also ensures your products reach your customers without undue delays.  Moreover, you can focus your efforts on growing your business instead of dealing with customer complaints and questions around package delivery status or postage due at the time of delivery.

What can you do to ensure a seamless shipping experience from the time your package leaves your hands and reaches your customer?  Follow these five easy USPS shipping guidelines!

Pay Attention To Your Package

Guideline #1 – Round up on Weights:  Did you know that the USPS rounds up package weights to the nearest ounce or pound depending on the mail class used?  To avoid underpaying for postage or even worse having your customer pay postage at the time of delivery, always round up your package weight.  As an example, if your package weighs 10 lbs. and 5 oz., you should use the shipping rate for an 11 lb. package.

Guideline #2 – Check the Dimensions:  Your package size can make a difference in how much you pay shipping!  Dimensional (DIM) weight may apply to a USPS package that is larger than 1 cubic foot (12″ x 12″ x 12″).  Pay attention to the dimensions of your package and avoid unnecessary empty space to lower shipping costs.

Does Your Shipping Label Match Your Package?

Guideline #3 – Verify the Mail Class:  What mail class should you use to ship your package?  This depends on the weight of your package, how soon you need it to be at its destination and also how much you want to pay for shipping.  Remember, each mail class allows packages up to a certain weight limit only.

Guideline #4 – Double check the Shipping Zone:  USPS Shipping Zones are calculated based on the distance between the origin and destination addresses.  Stamps.com customers should verify that the origin zip code (the zip code for where you ship your packages from) is set up correctly.

Guideline #5 – Match the Label to the Packaging:  Your shipping label should match your package!  For example, based on the package weight, size and shipping zone of your package, if you have decided to use a Flat Rate Priority Mail Box for your package, make sure to choose the corresponding mail class while printing your label.  Also, your Flat Rate label must only be used on a Flat Rate box.

USPS Shipping Made Easy With Stamps.com

When you ship with Stamps.com, you don’t need to worry about underpaying for postage.  Use your Stamps.com digital scale to accurately weigh your package and the software will automatically use the rounded up weight and charge you the appropriate shipping rate.  Next, enter the package dimensions so Stamps.com can determine whether or not DIM weight applies to your package.  Select the correct package type or enter the dimensions of your package.  Also, make sure to set up your origin zip code correctly. When you enter the destination address, Stamps.com automatically calculates the correct shipping zone for your package.  Finally, choose your mail class and Stamps.com will print the appropriate USPS shipping label for your package.

Shipments can sometimes be lost during transit, including orders to your customers. How do you help customers who are reaching out for assistance? USPS provides resources to try to locate missing mail and packages, and the USPS Mail Recovery Center serves as the hub for lost items. We also have tips to prevent packages from going missing in the first place. If you’re feeling lost about lost packages, you’ve found the right blog. 

Tips to prevent lost packages

  • Confirm the address before sending, especially for communal living spaces 
  • Purchase additional insurance for high-cost items like jewelry or electronics
  • Enable tracking notifications so customers know when their package will arrive
  • Include labels on the inner packaging in case the outer label is damaged or illegible
  • Label your package clearly and legibly and use tape to cover the label to avoid damage

USPS Mail Recovery Center

As we mentioned earlier, the USPS Mail Recovery Center acts as a centralized location for lost mail and packages. All packages and mail are examined upon arrival. If packages or envelopes are deemed valuable (over $25 in merchandise or over $20 in cash), they will be opened by USPS personnel to try to reunite the items with their sender or recipient. Mail with a barcode will be kept for 60 days, and mail without a barcode will be kept for 30 days. After this time frame, items will be donated, thrown away or recycled, or auctioned off.

Steps to search for missing mail 

USPS offers free resources to try to track down missing mail and packages. The first step is to track your package, followed by submitting a couple of different forms. This process is designed to give USPS detailed information about your package to hopefully increase the chance of it being found. 

Track your package 

The first step is to track your package. It might seem straightforward, but checking the tracking details of your shipment might show where/if the package was disrupted in transit. The tracking information will also show delays or if a package is being held at the post office for pickup. We recommend taking screenshots or writing down the tracking information shown because USPS may ask for this information later on. 

Complete the missing mail search form 

If entering the tracking information doesn’t provide answers, fill out a missing mail search form. This form will ask for your shipment’s tracking number, carrier service, and other attributes. Be as specific as possible and answer as many questions as you can. 

Fill out a missing mail search request

After tracking your shipment and completing the missing mail search form, wait seven business days. If your package still hasn’t reached its destination, you’ll fill out a missing mail search request. USPS does require you to create an account to access the form, but account creation is free. The missing mail request will ask questions about the contents of your package as well as the packaging used and any identifying details. USPS also recommends sending pictures of your shipment if possible. 

Additional steps for missing mail 

Once you’ve submitted a missing mail search request, check for a confirmation email from USPS; updates will also be sent via email. Recovered mail will be sent to its destination. However, if a package is deemed unsafe, it won’t be eligible to move forward in transit. It’s also important to note that some packages are unable to be found. 

If your package is unable to be recovered or you used a guaranteed service and/or a service with included insurance, you can: 

Shipping insurance 

Priority Mail® and Priority Mail Express® each include $100 of insurance for eligible shipments. This insurance doesn’t come with an additional cost and is a benefit of using the services. If your package is lost or damaged, you can send a claim to USPS for potential reimbursement. To file a claim with USPS, you’ll need to create a free account. Additionally, confirm your claim is being filed within the following timeframes: 

  • Priority Mail Express®: Between 7-60 days*
  • Priority Mail COD: 15-60 days* 
  • Priority Mail®: 15-60 days* 

*Note: Claims should be filed before 60 days. 

Lastly, collect all of the documentation listed by USPS before submitting your claim. This way, you can fill out your claim and help prevent having to resubmit information. If you’re filing a claim for a customer, let them know to keep all of the packaging and information they have until USPS resolves your claim. USPS outlines the documentation needed to file a claim we’ve included below, and additional information can be found on their website.* 

*Note: This information is directly from the USPS website, so we recommend reaching out to USPS with any questions. 

Tracking or Label Number

  • The tracking or label number is found on your online label record, package label, mailing receipt, or sales receipt. Tracking and label numbers are between 13 and 34 characters.

Evidence of Insurance Purchased

  • Any of these items show evidence of insurance:
  • Original mailing receipt issued at the time of mailing
  • Outer packaging showing the names and addresses of the sender and the addressee and the proper label showing that the article was sent insured
  • Printed electronic online label record or computer printout from the application used to print the label and purchase the insurance

NOTE: USPS may not legally pay compensation for uninsured lost or damaged articles. If your uninsured mail is missing or delayed you may request a Missing Mail Search.

Proof of Value

Proof of value is the cost or value of an item when it was mailed. Any of these can be used to show proof of value:

  • Sales receipt
  • Paid invoice or paid bill of sale
  • Statement of value and/or estimates of repair costs from a reputable dealer
  • Credit card billing statement
  • Receipt of costs incurred for reconstruction of non-negotiable documents
  • Printouts of the online transaction identifying the purchaser and seller, price paid, date of transaction, description of item purchased, and assurance that the transaction status is completed

Proof of Damage

Photos that clearly show the extent of damage will help with your case. For damaged claims, you’ll also need to provide an estimate of the repair costs from a reputable dealer.

  • Save the original packaging and everything in the package until your claim is settled.
  • Do not throw out damaged items, even after you photograph them.
  • Do not reship items that were not damaged. Save them with the damaged items.
  • You may be asked to take the entire package to your local Post Office™ facility for inspection.

How to add delivery confirmation in Stamps.com 

Another way to decrease the risk of lost packages is with delivery confirmation. Delivery confirmation comes at no additional cost when using Priority Mail®. This feature provides information about the time, date, and zip code of when the package was signed for. Also, delivery confirmation will show a delivery attempt if your package couldn’t be delivered. 

To add delivery confirmation on Stamps.com Online: 

Select the Tracking drop-down menu under the Mail Tab of your dashboard and click Signature Required. 

To use delivery confirmation with Stamps.com PC Software: 

Once you select the mail class for your package, go to the Packages Tab on your dashboard. For shipments using Priority Mail Express®, click the Delivery Options button and select Signature Required. 

If you’re using another service, select the Tracking drop down menu and then click Signature Confirmation.

Delivery confirmation information is available for up to a year after the delivery date. You can receive a copy of your recipient’s address by calling USPS at 1-800-222-1811 on Monday through Friday from 8:00 AM to 8:30 PM ET. Signatures can be mailed, faxed, or emailed to you directly. Mail requests are sent through First-Class Mail® and are usually delivered within 2-3 business days. Fax requests are typically completed within two hours and can be received 24/7. 

Mail and Ship Anything From Home, Office, or Your Phone.

267203_Blog-Free-Shipping-on-a-Small-Business-Budget

What would you say if we told you 68% of customers take shipping costs into account when deciding whether or not to purchase an item? That’s exactly what our recent study found. With more than half of customers expecting free or low shipping costs, it’s worth taking into account. We understand offering free shipping might not be an option for your business year-round. However, there are ways to still meet customer expectations without breaking the bank. 

Offer free shipping during big holidays 

Offering free shipping during big holidays like Christmas or popular sales times like Black Friday and Cyber Monday is a given. But, you might be missing out on sales by limiting free shipping promotions during the holiday season. Holidays like Valentine’s Day, Memorial Day, and the Fourth of July also include discounts and sales, so they serve as an opportune time to offer free shipping to customers. If you can’t offer free shipping throughout the year, utilizing other holidays to offer free shipping is the way to go. 

Set a minimum cart value

We’ve all seen in-cart messages that show us how much more we need to spend to qualify for free shipping. If customers are close to the free shipping threshold, they’ll be more likely to add a couple more items to their cart. This especially rings true during big shopping seasons. Add a minimum cart value that makes sense for your business to provide customers with a free shipping option. 

Additionally, you can make free shipping available for more expensive items to give customers an added incentive to complete their purchases. In our study, almost 61% of customers stated high shipping costs were the number one reason preventing their repeat business. Your business might not be able to offer free shipping on all purchases. But, your customers will appreciate the effort to incorporate free shipping where you can. 

Reward repeat customers with free shipping 

Customers return to your business because they had a positive experience and like your products. Keep customers coming back through exclusive offers like free shipping. Whenever customers share photos of your products on social media, ask if you can repost the content and send them discount codes for free shipping or sales on their favorite items; reward followers with giveaways that range from free products to exclusive deals. 

Social media isn’t the only way to promote free shipping! Stamps.com merchants can customize branded ship notification emails. These emails allow you to personalize a tracking page to include your logo, social media links, and a promotional message to boost the visibility of any running sales. Customers will receive emails throughout the shipping process, so they can take note of any sales. Those who order from your business regularly will be the first to know about free shipping or upcoming sales. 

Prioritize free returns 

Free returns are becoming increasingly important with customers. In fact, our study found 81% of customers believe returns should always be free. Free returns and free shipping might not fall within your business’s budget, so we recommend prioritizing free returns. The customer expectation around free returns is higher than free shipping, so offering free returns is crucial. As we’ve mentioned, you can offer free shipping during holidays and over a certain threshold, but free returns should be accessible for every order. 

Tips for offering free shipping

  • Offer free shipping during holidays like Memorial Day and the Fourth of July along with Christmas and other major holidays. 
  • Calculate a free shipping threshold and include in-cart messaging to show customers how much more they need to spend to qualify for free shipping. 
  • Incentivize customers with free shipping and promo codes through social media and branded ship notification emails. 
  • Prioritize free returns over free shipping because customers have a higher expectation for online returns.
277753_New-creative-request-blog-images-Stamps-1

Back-to-school shopping for both grade schools and colleges has been on the rise. According to the National Retail Federation, 2022 yielded almost $37 billion for grade shopping and almost $74 billion in college shopping; 4.5% of this amount includes books. 

Although the school year is coming to an end, the time for summer courses and recreational reading is at hand. Not to mention summertime tends to fly by, so it’ll be time for the next school year before you know it. Your customers are reading year-round, so learning how to ship books can boost sales. With the help of our five tips, you’ll be a book shipping expert in no time. 

1. Learn Media Mail guidelines and restrictions 

Media Mail is a service offered through USPS for merchants who ship books and other media-based materials like CDs, DVDs, and test materials. However, like most carrier services, Media Mail comes with its own set of restrictions. Comic books and marketing materials aren’t eligible for the service. Also, Media Mail can only be used for domestic shipments and is subject to inspection. Restrictions aside, Media Mail does include free tracking and can be used for shipments up to 70 pounds with a girth of 108 inches. 

2. Compare shipping costs 

Media Mail can be a great resource, but we recommend comparing rates before making a final decision. If a shipment is on the lighter side, Priority Mail® may prove to be the more affordable option. Stamps.com users can compare shipping rates in real time with Rate Advisor to find the best available service for your shipment. After entering all of the information for your shipment, expand the Service or Carrier drop down menus and select Compare Services and Rates. Then, explore the given carrier service options to find the carrier service that fits your needs. 

3. Use free shipping materials when available

If Priority Mail does prove to be your carrier service of choice, take advantage of the free shipping supplies offered by USPS. These supplies are sent directly to your home or business and can be ordered from your Stamps.com account. If the 7-10 delivery window doesn’t work for your business, most post offices also carry free supplies for customers. Priority Mail shipments can weigh up to 70 pounds, so the boxes and envelopes work perfectly for books, CDs, and other products.

4. Communicate shipping times with customers 

When using services like Media Mail, delivery times might be a bit slower than customers are used to at an estimated 2-8 days. Share delivery windows at checkout to avoid a negative customer experience. Our recent study found 31.5% of customers are less likely to give a store repeat business if their shipment arrives later than communicated, so keep your customers in the loop and provide accurate delivery windows up front. Your customers can look forward to curling up with a good read and be more likely to shop from your business in the future. 

5. Utilize Stamps.com automation rules

Once you’ve found the service and package that works for your business, avoid manually entering information for each new order with Automation Rules. Automation Rules automatically apply carrier information and packaging to shipments within the given criteria. For example, you can create an automation rule where items with a specific SKU assign Priority Mail as the carrier service. Automation rules help get shipments to customers faster for ample study and/or reading time. 

Conclusion

Your customers are looking to your business to provide a new adventure or a helpful resource for class. Compare shipping rates, select a service, create a label, and get ready to send your book on its way. Then, do it all over again with automation rules until your customers have every book in the series. You can’t judge a book by its cover, but Stamps.com does make shipping as easy as it looks. 

Open a new chapter and start your 30-day free trial to Stamps.com today.

Additional shipping costs can be stressful, especially when charged after your package has shipped. Carrier adjustments can add up, but fortunately, you can work to avoid them. Learn where to find adjustments, how carriers calculate these fees, and what you can do to prevent fees

What are carrier adjustments?

Adjustments are extra fees or credits added to your shipping cost after a carrier processes a package. The additional charges are calculated by subtracting the amount of postage paid for a shipment from the shipping costs that should have been paid. For example, you may have paid $10 in shipping costs. However, your shipment reaches USPS, and they find the shipping costs should’ve been $13. Your adjustment charge would then be $3. 

Where to find adjustments

USPS and UPS adjustments can be found in your Stamps.com history. Keep in mind that there’s a delay between when an adjustment is given by a carrier and when the adjustment is shown in your account. To view adjustments, follow the steps below. 

  1. Click on the History tab to view recent shipments. If a shipment was given an adjustment, it will be listed in the Adj. Amount column.  Once you click on the shipment, you’ll see more information on why the adjustment was issued. 
  1. To find these additional details, select the shipment to open the Order Details panel. In the example below, the adjustment was issued because incorrect dimensions were entered when the label was created. 

USPS adjustments 

Some of the most common reasons for adjustments include entering incorrect dimensions and weight as well as using/entering the incorrect packaging. As a reminder, the maximum weight for Priority Mail Flat Rate® Boxes (all sizes) is 70 pounds. Additionally, weight is rounded up. For example, if your shipment weighs 70.2 pounds, it will be rounded up to the nearest pound, making it too heavy for the service. Dimensions for Priority Mail Flat Rate® Boxes will need to be entered when creating your label as well. 

Non-machinable surcharges 

Another type of surcharge given by USPS is a non-machine surcharge. This surcharge is applied to pieces of mail and packages that aren’t able to be automatically sorted through USPS machines. Reasons a non-machinable surcharge might be issued include illegible addresses or non-traditional sizes that require these items to be manually sorted or assessed. 

UPS adjustments 

UPS® shipments can be up to 150 pounds and have a maximum length of 108.” However, if your package is over 50 pounds, it’s subject to UPS Additional Handling fees. UPS Additional Handling charges are extra fees applied to your shipping cost for shipments that need different handling. Some of these include: 

  • Packages with the longest side over 48” or the second-longest side over 30”
  • Domestic shipments over 50 pounds and international shipments over 70 pounds 
  • Packages with a combined length and girth [ (2 x width) + (2 x height) ] of 105” 

Common UPS surcharges 

Three avoidable UPS adjustments are Over Maximum Size surcharges, Large Package surcharges, and Shipping Charge Corrections.

Over Maximum Size surcharges are extra fees applied to your shipments that exceed UPS’s sizes of 150 pounds, 108” long, and have a combined length and girth of 165”. 

Large Package surcharges are extra fees applied to your shipments when: 

  • A domestic package’s length + girth are over 130”, or its length is over 96” 
  • An international package’s length + girth are over 130”
  • Packages with a minimum billable weight of 90 pounds (except for UPS Ground®)

Shipping Charge Corrections are extra fees applied to each shipment with incorrect dimensions and/or weight. These charges are $1 per shipment, along with the additional shipping cost needed for the corrected dimensions and/or weight, and these shipments are also still subject to other surcharges like Additional Handling charges. 

How to dispute adjustments 

The steps for disputing an adjustment will vary by the carrier. It’s also important to note that approval is at the carrier’s discretion. We’ve included the process for disputing adjustments with USPS, UPS, and DHL below. 

Disputing USPS adjustments 

USPS adjustments will be disputed with USPS directly through email by contacting [email protected]. Before sending your email, confirm all of the following information is included: 

  • The tracking number associated with your package 
  • The adjustment ID from the Order Details panel 
  • The reason the adjustment is being disputed* 

Note: We recommend adding as many details as possible. 

USPS will follow up via email if they need additional information. Once USPS has reached a decision, they’ll reach out to Stamps.com, and we’ll forward their email response to you. 

Disputing UPS adjustments 

To dispute UPS adjustments, please fill out our UPS from Stamps.com Shipping inquiry form here. Adjustment disputes need to be made within 90 days of billing. 

Disputing DHL adjustments 

You’ll contact our Customer Care team via email or phone for adjustment disputes. Our team can be reached via email or phone at 1-855-860-7867 from Monday – Friday, 6am to 6pm PT. 

Tips to avoid adjustments 

As previously mentioned, incorrect weight, dimensions, and packaging are some of the most common reasons for adjustments. You can decrease the likelihood of adjustments through: 

  • Measuring shipments multiple times for accuracy 
  • Rounding dimensions up to the nearest weight or pound 
  • Confirming your scale calibration is correct before weighing
  • Checking carrier websites for service restrictions and dimensional limits 

Conclusion 

Don’t let shipping adjustments catch you off-guard. Checking all of your measurements multiple times before creating a label will minimize the risk of additional fees. Familiarizing yourself with carrier dimensions will prevent sending shipments through the wrong service. Adjustments can be costly, so understanding how to avoid them is crucial. Keep your shipping budget intact by bookmarking this blog.

Start your 30-day free trial with Stamps.com today.

Shipping Eggs with USPS

Which came first—the chicken or the egg?  The egg, if you ship it through the U.S. Postal Service! Since eggs are mailable with the USPS under certain guidelines, you can use Stamps.com to make the process easy for you.

Eggs are very sensitive to temperature changes, so monitoring weather for upcoming snowstorms or heat waves that may affect the shipping destination is a good idea. Send them by a fast mail class such as Priority Mail Express.

How should I package my eggs?

When you’re shipping eggs, the USPS also asks that you individually cushion each egg. Use bubble wrap to avoid breakage and shock-proof packaging material such as shredded paper to cushion the individually bubble-wrapped eggs.  Pack your individual eggs closely but not too tightly.

A number of egg varieties exist, from a Rhode Island Red’s brown eggs to a Leghorn chicken’s white ones, but using a USPS Flat Rate Box, such as the Priority Mail Medium Flat Rate Box, will keep your postal rates consistent for all types of eggs. What’s more, barcoded shipping labels printed via Stamps.com have built-in, free tracking. You can also use our Shipment Notification feature to email tracking information to your recipients and give them an accurate idea of when to expect their package.

Don’t crack under the pressure: you can order free USPS packaging by logging into your software and clicking on “Online Store,” which appears beneath “Buy Supplies.”  Click on the “Free USPS Supplies” tab and order the right box or envelope for your mailing needs today!

For peace of mind, we recommend requesting a free USPS pickup when shipping eggs.  The free USPS pickup service is available for Priority Express Mail, Priority Mail, Priority Express Mail International, Priority Mail International and Global Express Guaranteed. In the Stamps.com software, click “USPS Pickup” from the “View History” menu on the left navigation bar of the software to start the process.

For further USPS details on mailing eggs domestically, please see:   http://pe.usps.com/text/pub52/pub52c5_010.htm

Can I send eggs internationally?

If you want to ship eggs to a destination outside of the U.S., you must use Priority Mail International. We recommend researching specific import restrictions by accessing the Individual Country Listings here: https://pe.usps.com/text/imm/immctry.htm

For specific packing instructions on mailing eggs internationally, please see: https://pe.usps.com/text/pub52/pub52c6_015.htm