How to use AdWords keyword planner

If you’re just starting out with AdWords for your online business—or are curious about digital marketing in general—it can be very confusing to figure out how to deal with keywords. Fortunately, Google has long included a keyword planning tool as part of the AdWords platform that handles advertising campaigns within its search engine network.

Even if you’ve worked with the keyword planner before, you may need a refresher since Google recently redesigned the entire AdWords portal, including the planner.

Here’s how to use to Google’s AdWords keyword planner to figure out which keywords you want to include in your search marketing campaigns.

Evaluating Keywords With Google AdWords

To get started, first navigate to Google AdWords and create an account, if you haven’t already.

Once you’ve logged in, you’ll be presented with the AdWords home page and are ready to begin.

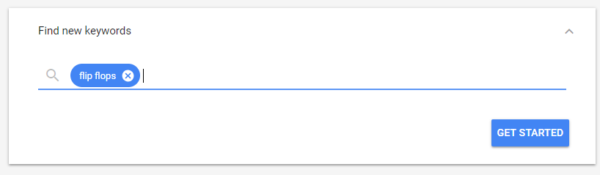
1. Click on the wrench icon in the upper-right toolbar, then select “Keyword Planner” from the “Planning” column.

Click on the wrench icon in the upper-right toolbar, then select “Keyword Planner” from the “Planning” column.

2. Enter a specific keyword or key phrase related to your site, or simply enter the link to the website itself. The Planner uses this information to display suggestions for related keywords.

Input keyword
This screen displays a variety of related keywords and key phrases, and gives you several options for organizing and analyzing the results.

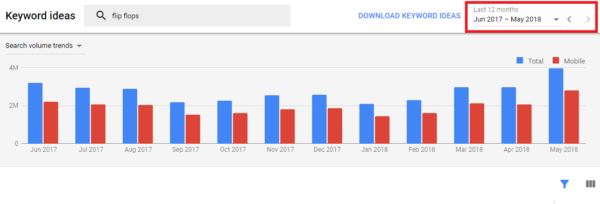
3. The next page is the main section of the Keyword Planner, “Keyword ideas.” This screen displays a variety of related keywords and key phrases, and gives you several options for organizing and analyzing the results.

4. If you want to narrow down the results by location or language, use the drop-down menus at the top left of the screen.

drop-down menus at the top left of the screen.

5. To only see keyword ranks for specific times of the year, adjust the date range in the calendar drop down at the top right of the screen.

To only see keyword ranks for specific times of the year, adjust the date range in the calendar drop down at the top right of the screen.

6. To see which related keywords and phrases are searched for most often, click the “Avg. monthly searches” button at the top of the related column to re-sort the results.

To see which related keywords and phrases are searched for most often, click the “Avg. monthly searches” button at the top of the related column to re-sort the results.

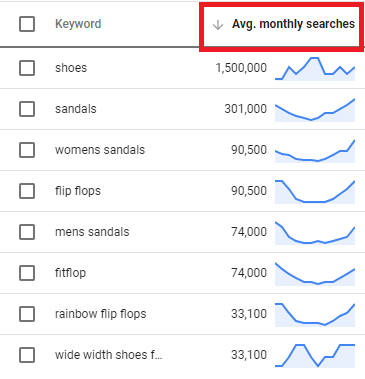
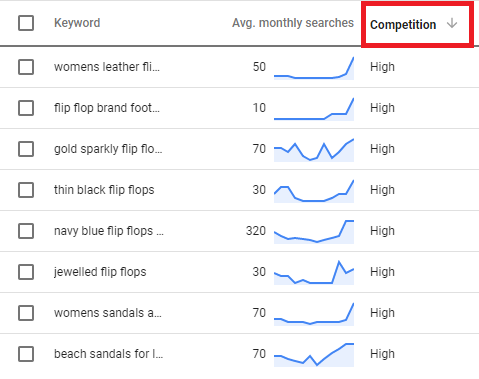
7. Sorting the “Competition” column tells you how difficult it would be to “break into” the search results for those keywords or phrases. High competition keywords already have other ads that dominate those search results, while low competition words are easy to increase ranking.

Sorting the “Competition” column tells you how difficult it would be to “break into” the search results for those keywords or phrases.

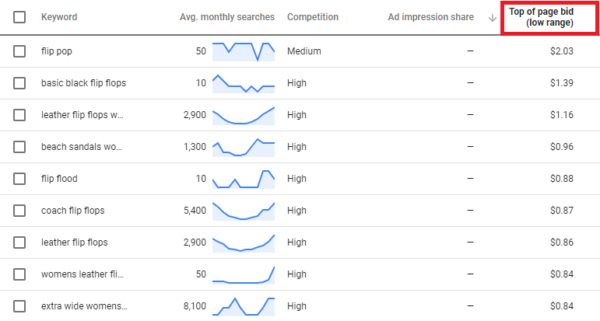
8. If you plan to use these keywords to develop an advertising campaign, use the “Top of page bid” columns to see how much you’d need to spend to have your ads rank highly.

If you plan to use these keywords to develop an advertising campaign, use the “Top of page bid” columns to see how much you’d need to spend to have your ads rank highly.

Whether you just want ideas for new keywords or projecting marketing budgets, AdWords Keyword Planner is a valuable tool. Search engine marketing is all about getting a leg up on the competition, and mastering AdWords Keyword Planner can give you just the competitive advantage you need.

Certified mail FAQ

Certified Mail is a USPS service that gives mailers an official receipt providing poof the item was mailed. After the Certified Mail document is delivered, the mail carrier requires a signature from the recipient. Mailers using Certified Mail can also request a physical or electronic Return Receipt with the recipient’s signature. Here are some of the most frequently asked questions about the USPS service:

How long will it take for USPS to deliver my Certified Mail letter?

Delivery time depends on the mail class chosen to add the Certified Mail service to. If you are sending a First-Class Mail letter, delivery usually takes 2 to 5 business days. For Priority Mail, delivery is usually within 2-3 business days. However, USPS does not guarantee an exact delivery time for either First-Class Mail or Priority Mail.

Why would I use Certified Mail?

Mailers typically use certified mail when they need to provide proof that a mailpiece was sent and received. The most common uses of Certified Mail are to send tax returns, bank documents, and time-sensitive communications with debtors or creditors.

Do I have to be present at a Post Office to send Certified Mail?

No, as long as you affix the proper Certified Mail Forms and the correct amount of postage, you can have a USPS mail carrier pick up your Certified Mail mailpiece or drop it in a mailbox.

Can Certified Mail go to a P.O. Box?

Yes, when Certified Mail arrives at the delivery Post Office, the letter carrier will place a delivery notification inside the P.O. Box that instructs the person to present the delivery slip to the window clerk. Keep in mind that a recipient is under no legal obligation to sign the delivery slip regardless of where the mailpiece is delivered.

Can anyone at the mailing address sign for Certified Mail?

Yes, with standard Certified Mail anyone present at the mailing address can sign for the mailpiece. If you send a mailing with restricted Certified Mail, however, only the person who it is addressed to may sign for it.

Which name goes on the receipt, mine or the person I am mailing it to?

On the green and white “Certified Mail Receipt”, write the name of the person you are mailing the mailpiece to. Their address should be entered at the bottom.

If the Certified Mail is returned to sender as not deliverable, should the sender sign the green card?

No, the sender should not sign it. The fact that it was returned as undeliverable with the unsigned green card intact is proof that you tried to send it.

How can I use Certified Mail with Stamps.com?

  1. Connect to Stamps.com to print Certified Mail – Our software connects you to your Stamps.com account where you can print Certified Mail.
  2. Click on “Envelopes” from the left navigation bar.
  3. Select “Letters” as your Mailpiece type.
  4. Enter the weight of your mailpiece.
  5. Select your mail class – Keep in mind that only First-Class Mail and Priority Mail are options when you use a Certified Mail Form or Envelope.
  6. Choose additional services – At this point, you may select options such as Return Receipt and Restricted Delivery. Remember, depending on your chosen services, unused portions of the form may contain the word VOID when printed.
  7. Specify the required address information for your mailpiece.
  8. Select your printable choice – From the “Printing On” list, select Stamps.com’s pre-formatted Certified Mail Envelope or Form.
  9. Print – Load the form into your printer, then click “Print Postage.” We recommend you print a sample on a blank sheet of paper so you know the correct loading direction for the form. And remember, the method of affixing the Certified Mail Form to your mailpiece will depend on any additional services you selected in Step 8. Pay close attention to the directions printed on the form to ensure you affix it properly to your mailpiece.

Don’t worry about IMI compliance with Stamps.com. Learn more