We hear you – managing returns is frustrating. It can feel complex, time consuming, or even like the death of a sale. That said, 60% of shoppers who make at least one return to an online store, a whopping 95% of them will purchase from that store again if the return experience is positive. Moreover, if those shoppers feel that their return or exchange was an easy process, 64% of them will refer that online shop to friends. So even though returns may feel like an e-retailer’s nightmare, they can actually be the catalyst for more sales and new customers. In order to win back those sales, you have to make sure your return process is a walk in the park.

Here are 3 simple ways to guarantee a better return experience for your customers:

#1. Make It Clear
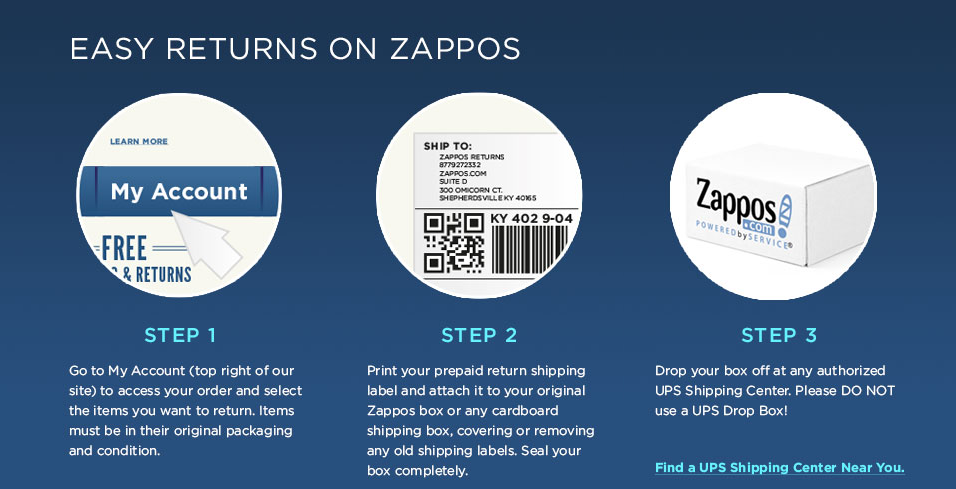
Your return policy must be easy to find on your site, with all policy information clearly stated. Be detailed and include all rules, like what you will provide (return postage, for example), and a step-by-step guide on how to proceed with the return. If you’d like an example, Zappos.com has a detailed and clearly outlined returns process that appears simple for the customer. Model your return policy webpage after theirs.

Zappos

#2. Know The Worth Of Returns vs. Customer Service
Figure out ahead of time the value of letting buyers keep the original item and sending them a replacement, vs. asking that they go through the return process. There are some cases where it is actually better for your company’s reputation, even if you end up eating some of your profit. See below for an example from Practical Ecommerce’s 4 Tips for Better Ecommerce Returns and Exchanges where this special circumstance played out:

A guitarist for a popular party and event band recently ordered a new guitar strap from a merchant on the Amazon marketplace. Unfortunately, there was an error in the shipment, and the merchant apparently sent a shorter strap than expected. When this guitarist contacted the seller about an exchange, he was told that a new strap would be shipped that day and that he could simply keep the smaller strap.

This solution was great for the customer, who did not have to repackage the strap or arrange for a carrier to pick it up. He was generally happy with the experience. This was probably also better for the merchant, who might have simply been able to order a new guitar strap from its distributor for about the same cost as having the strap returned.

In order to determine whether or not you can provide this kind of special customer service, you need to know all applicable variables. This includes cost of return shipping, cost of processing the return and profit lost on the item. Sometimes, a small (or fairly insignificant) loss will lead to a huge gain later. A customer could be so impressed with your service that they will not only shop from you again, but they’ll refer friends. Don’t forget, 64% of buyers will speak highly of retailers that gave them a positive return experience.

#3. Bring The Policy To Them
You already know not to bury your return policy landing page somewhere on your website where shoppers will have a hard time finding it. To keep them in the loop, consider posting (just once) on your social media sites either a link to your return policy page or a cliff notes version for them to quickly scan. Doing this will communicate that you are on their side and want them to be happy with their purchase – and if there is an issue, you want to make the return easy for them. This can be especially timely during the holiday season, and may be a smart post for December 26th. Drive it home with a follow up post inviting social media followers to share pictures of themselves with their new products. The more you can establish an emotional connection between your business and your buyers, the better your business will perform. According to a 10-year study conducted by Hiebing, brands that evoke a strong emotional response can sell more, drive customer loyalty and successfully charge up to 200% more than competitors.

With these tips in your back pocket, you can simplify the return process for your e-commerce store. Your buyers will appreciate it, and so will your bottom line. Of all the customers who make returns, are you ready to bring back the 95% who will shop from you again?

ecomdash_logo_small

Ecomdash is an award-winning multichannel inventory software for ecommerce retailers. It offers an end-to-end ecommerce solution to complete workflow, including inventory and sales order management, product listing, dropshipping and fulfillment management, reporting and more.

Blog - Free Package Tracking Media Mail

As of May 31, 2015, USPS Tracking can now be added for FREE to Media Mail packages.  Prior to the 2015 USPS Postage Rate Increase, it would cost $1.05 to add USPS Tracking if purchased at the Post Office and $0.23 if purchased online with Stamps.com.

No Action Needed For Stamps.com Customers

Stamps.com customers do not need to make any changes to their shipping processes to access free USPS Tracking for their Media Mail packages.  Simply navigate to the “Packages” tab and select “Media Mail” in the drop-down menu for mail class.  You will notice Tracking is included for FREE.

blog_media-mail-free-tracking

Lowest Cost Option For Packages That Qualify

With USPS Tracking now included for free, USPS Media Mail still remains the lowest cost option for qualifying items like books, CDs, DVDs etc.  If your package qualifies, you can save big with Media Mail.


Personalizing your mail is a great way to create a strong first impression on your customers and Stamps.com’s powerful Graphics feature can make that happen for you!

With the Stamps.com software, you can add Return Address and Postage graphics to your Envelopes, and Return Address graphics to your Shipping Labels.

How to Add Graphics Using Stamps.com

  • Use Your Own Graphic File: Just look for the Graphic icon above the Return Address text field. If you want to include a graphic next to the postage in the top right corner of your postage label, just look for the Delivery Address text field.  Select the Include Graphic check box, and then click Browse to locate a graphic file.  You can select the graphic you want to use from your computer.
blog_graphics-envelopes-labels_1

  • Use A Pre-Existing Graphic File: If you don’t have your own graphic, Stamps.com has you covered!  Our software offers a wide variety of pre-existing graphics for business, personal and seasonal use, from Fragile and Happy Groundhog Day images, to graphics like Grad Hats, Air Mail, Babypins, and Scales of Justice.  Fun and clear images like Wedding Cakes, Sports Cars, and Handle With Care will give your letters and packages that extra personal touch.
blog_graphics-envelopes-labels_2

Need more graphics?  Stamps.com has some free plug-ins that you can install from here.

Tips for Adding Graphics

  • If you’re adding your own graphic, make sure that your image file is either a .bmp, a .png, or .jpg file type.
  • Keep your image clear and simple! Your graphic will appear within the confines of a very small space (about 1 cm x 1.5 cm), so the simpler and less detailed the image, the clearer it will look to your recipients.  Our software will auto-size it for you.  Our library of existing images will give you an idea of what sort of images look best.
  • Adding graphics for the first time? We recommend printing a zero-cost sample by clicking on the gray Print Sample button.  This will test your printer and give you an idea of what your actual live postage will look like.
  • Don’t see an option to add graphics? Make sure you are logging into the Stamps.com software via your desktop icon.
  • To stop printing a graphic, clear the Include Graphic check box.
  • Did you add your own image and now you want to get back to Stamps.com’s library of Graphics? No problem!  When you hit the Browse button, look for our graphics under Local Disk (C:) > Program Files > Stamps.com Internet Postage > Images.
224428_Blog_Ship-to-United-Kingdom

Did a customer in Scotland just buy one of your products and you need to ship your merchandise over?  Do you need to send a gift to a relative in London?  Learn how to use Stamps.com to ship packages to the United Kingdom (U.K.)!

How to use Stamps.com for packages headed to the U.K.

Once you are ready to ship your package to the U.K., you will need to enter the mailing address details as well as choose the destination country from the drop down menu in Stamps.com.

Stamps.com offers many options; however, the easiest and most popular option is to choose United Kingdom (Great Britain) from the country drop down menu.  As long as you choose United Kingdom (Great Britain), your package should reach its destination anywhere within the country without any issues.

A few other options offered by Stamps.com are explained below:

  • If your package is headed to a constituent country of the U.K. (which consists of England, Scotland, Wales, and Northern Ireland), you can select the individual country names (e.g. England, Scotland, Wales, Northern Ireland) or simply select United Kingdom (Great Britain).
  • Shipping a package to a crown dependency (examples include Isle of Man, Bailiwick of Jersey, Bailiwick of Guernsey etc.)?  These destinations fall under the general USPS descriptor of “Great Britain and Northern Island.”  In Stamps.com, these locations are listed individually (e.g. “Jersey”).  You can select these individual listings or just select “United Kingdom (Great Britain).”
  • Using the Stamps.com web version to print postage?  Choose Great Britain from the country drop down menu to ship your packages to the U.K.

Important Note:  Sometimes long country names, such as “Scotland (Great Britain and Northern Ireland)” may cause issues because your label has limited space.  In cases like these or if you are not sure what country to choose from the drop-down menu, always default to United Kingdom (Great Britain). 

Addressing and Shipping Tips for Your Packages

  • The postal code is an important element of the mailing address that is required to ensure smooth and timely delivery.  Make sure to include the accurate postal code for your package headed to the U.K.
  • Stamps.com is designed to include all the essential information on your international label, so if you receive a message about your address being too long, simply abbreviate the county (province) name – for example, Hampshire as “Hamps” or “Worcestershire” as “Worcs.”
  • Customs fees, duties, tariffs and taxes may be charged on your packages being shipped to the U.K.  These fees are based on the value you declare on the customs form and are typically paid by your buyer in the U.K.  However, you can anticipate these by checking the website for the British customs service.
  • Before you ship your package to the U.K., make sure the contents do not fall into the prohibited or restricted categories; otherwise your package could be forfeited or held up at customs.  Stamps.com customers can see real-time restrictions within the software or you can get more info here.